

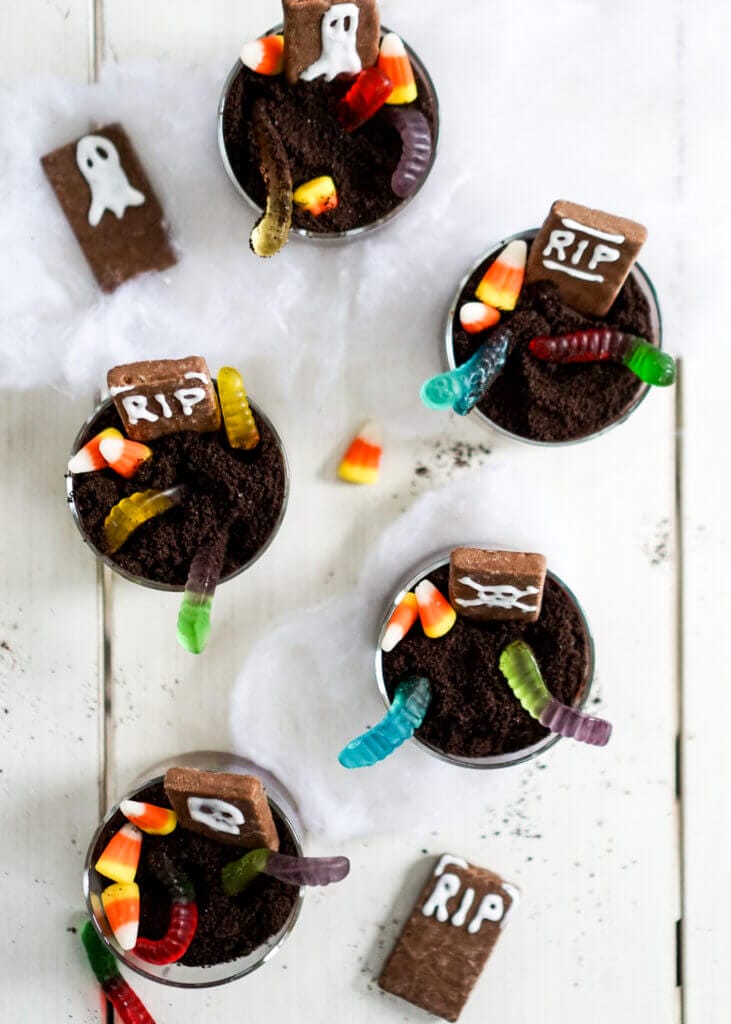
Here’s a simple, fun (and silky smooth) chocolate pudding that’s spooky and delicious! The pudding is topped with chocolate wafer crumbs that create the perfect ‘dirt’ pile, then they are topped with chocolate gravestones and candy worms! No kid can resist this treat, perfect for a Halloween party!
Whether you are a kid or not, Halloween is so much fun to get creative, make spooky treats, let the imagination flow and get into the spirit! You can use this festive dessert as inspiration to pair with your themed Halloween parties or keep them just as pudding graves. With just a touch of extra effort in sparking your creativity, this simple dessert can turn into loads of fun for everyone!

Ingredients
- Light cocoa powder
- Granulated sugar
- Cornstarch
- Milk
- Unsalted butter
- Vanilla extract
- Salt
- Chocolate wafer crumbs
- Coffee Crisp thins (at Bulk Barn)
- Wilton white decorating gel (at Bulk Barn)
- Gummi worms
- Candy corn (or candy corn pumpkins)
Candy
Here comes the fun part of creating graveyard cups, picking out your candy! My top tip is to keep the candy limited to 2-3 kinds in the chocolate pudding graves. If you load it up too much you’ll just have a big candy mess and really the dessert is about the creamy chocolate pudding! I know this might be challenging with kids but why not add bowls of candy on the side to create a buffet style with loot bags, etc.?
Inspiration and Candy Variations
- Gummy Worms
- Candy Corn
- Sugared/Candy Pumpkins
- Candy Eyeballs (or make your own with gumballs)
- Candy shaped Skeletons, Ghosts, etc.
- Cotton Candy as smoky clouds

Halloween Recipes
Here are some more Halloween inspired desserts:
- Halloween Reese’s Pieces Oatmeal Cookies
- Spooky Halloween Bark
- Candy Corn Shortbread Cookies
- Ghost Cupcakes

How to Make Halloween Gravestone Heads
Well, the options are endless when it comes to creating this spooky dessert! But here’s what I did to create Halloween tombstones. I found Coffee Crisp Thins at my local Bulk Barn store and thought they would be perfect. I used white, Wilton decorating gel to draw Halloween designs on the chocolate thins. Just keep in mind the gel doesn’t really harden, it will thicken up a little and get sticky but if you are expecting it to firm up it won’t. You can also make royal icing to decorate your gravestones. I think these little guys turned out perfect and it was a fun way to think outside of the box and use candy I like!


How to Make Halloween Chocolate Pudding Graves
Step One: Make your chocolate pudding. Combine cocoa powder, sugar, cornstarch and salt together in a large pot, whisk to combine. On medium heat, slowly add milk, continuously whisking to combine. Raise the heat to medium-high and continue to whisk until mixture comes to a boil. The pudding mixture should start to thicken. Boil for 1-2 minutes, continue to whisk so the bottom doesn’t burn. Remove from heat, add butter and vanilla, and stir to combine. Working quickly, pour pudding into little individual cups or jars.
Step Two: Cover jars with plastic wrap, pressing the plastic directly onto the pudding to avoid forming a “skin”. Chill for one hour. While the puddings cool make gravestone heads. Use decorating gel on Coffee Crisp Thins to design Halloween gravestones. Assemble the graveyard pudding cups. Add approx. 1 tablespoon of chocolate wafers to the tops of each pudding cup, creating a thick layer. Next, press the ‘gravestone’ heads into each pudding cup and add candy; gummy worms, pumpkin candies, etc.


Chocolate Pudding Graves
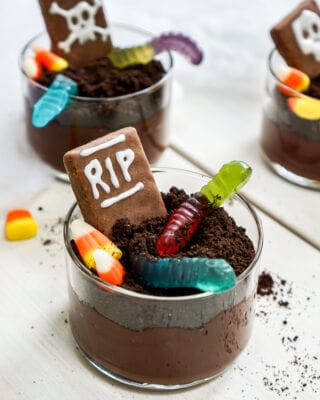
This to die for, no-bake Halloween dessert is easy and great for the kids to get involved! It’s a simple, fun chocolate pudding that’s spooky and delicious! The pudding is topped with chocolate wafer crumbs that create the perfect ‘dirt’ pile, then they are topped with chocolate gravestones and candy worms! No kid can resist this Halloween treat!
- Prep Time: 1 hour
- Cook Time: 8 mins
- Total Time: 1 hour 8 mins
- Yield: 4-5 1x
- Category: Treat
- Cuisine: American
Ingredients
Pudding
- 1/3 cup (40 g) light cocoa powder
- 1/3 cup (74 g) sugar
- 3 Tablespoons (30 g) cornstarch
- 1/4 teaspoon salt
- 2 1/2 cups (625 ml) milk
- 2 Tablespoons (28 ) unsalted butter
- 1 teaspoon vanilla extract
Toppings
- 5 Tablespoons (approx.) chocolate wafer crumbs
- Coffee Crisp thins (at Bulk Barn)
- Wilton white decorating gel (at Bulk Barn)
- Gummi worms
- Candy corn
Instructions
- Set aside 4 to 5 small jars.
- In a medium sized pot add cocoa powder, sugar, cornstarch and salt together, whisk to combine.
- On medium heat, slowly add milk, continuously whisking to combine ingredients. Raise the heat to medium-high and continue to whisk until mixture comes to a boil. The mixture should start to thicken.
- Boil for 1-2 minutes, continue to whisk so the bottom doesn’t burn.
- Remove from heat, add butter and vanilla, stir to combine.
- Working quickly, pour pudding into jars.
- Cover jars with plastic wrap, pressing the plastic directly onto the pudding to avoid forming a “skin”. Chill for one hour.
- While the puddings cool make gravestone heads. Use decorating gel on Coffee Crisp Thins to design gravestones (see images above for inspiration).
- Add approx. 1 tablespoon of chocolate wafers to the tops of each pudding cup. Next, press the ‘gravestone’ heads into each pudding cup and add gummi worms, etc.
Notes
Use any candy you like to create fun gravestones/Halloween treats like; candy eyeballs, pumpkins, etc.
The chocolate wafer crumbs will begin to soften over time. Serve chocolate pudding graves the same day.
The recipe easily doubles.
You can also make this into a spooky graveyard dirt cake by pouring the chocolate pudding into a 9×9 baking dish or pie plate. It’s a great way to serve a crowd at a kid’s Halloween party.
Nutrition
- Serving Size: 1 of 5 puddings (no candy)
- Calories: 185
- Sugar: 19g
- Sodium: 208mg
- Fat: 7.9g
- Saturated Fat: 4.9g
- Unsaturated Fat: 0
- Trans Fat: 0
- Carbohydrates: 27g
- Fiber: 1.8g
- Protein: 5.1g
- Cholesterol: 22mg
This blog post has been sponsored by Bulk Barn Canada where you can find all your candy inspiration! All opinions are my own and I’m so happy to work with brands I love so I can continue to share these recipes with all of you! I hope you guys get to a Bulk Barn soon and try out this recipe! Let me know in the comments if you enjoyed this recipe.
FAQ’s
Yes, if you don’t have chocolate wafer crumbs you can make your own. This can be done in two ways. One, add chocolate wafer cookies to a food processor and pulse until fine crumbs form. Two, use Oreo cookies and place them into a food processor and pulse until you have fine Oreo cookie crumbs. Use as it calls for in the recipe. Note: If you don’t have a food processor you can add cookies to a ziploc bag and using a rolling pin crush the cookies into fine crumbs.
Yes, you can make your chocolate pudding ahead but leave the decorating until ready to serve as the chocolate crumbs and candy may get soggy. Make sure to add the chocolate filling to your individual cups and cover with plastic wrap. Store in the refrigerator for up to 3 days.
You may also like:


Leave a Rating and Comment!
I love hearing from you! Leave a comment with any questions or how your recipe turned out (your email address will not be published)!
I’m a HUGE Halloween fan, every year I host a Halloween party with my friends and family. I made these and they were a hit! Super easy recipe and fun for Halloween 🎃
I remember making this recipe many years ago for my daughters birthday, She’s married now and has 3 sons one of which has and egg and dairy allergy. Seeing this recipe was a great reminder of this fun recipe especially around Halloween. I was able to make it vegan using oatmeal milk and it was a great hit.
Louise thank you for sharing, I love how food brings back memories and you can pass on loving traditions. Allergies can be so difficult and make us lose that love. But I’m happy to hear the recipe worked with oatmeal milk and they kids enjoyed it!
I love Halloween too, great to hear you enjoyed the recipe!
Well I didn’t do the recipe for Hallowe’en but used the pudding recipe when guests stayed for dinner. The dessert was so quick and easy and delicious. The presentation was great! I topped the pudding (in the jars) with whipped cream and served with a cookie on the side.
Great idea Suzie! Yes, the pudding can be used in so many ways not just for Halloween.