

I always know when spring is around the corner, not only because of the warmer weather and the longer sun-filled days but because every bakery window I pass is filled with hot cross buns!
I’m not even sure when I started enjoying hot cross buns, I do know I wasn’t interested in them as a child (does this mean I’m getting old?!). Maybe it’s the fact they only seem to come out once a year and they seem to disappear as quickly as they appeared.
It’s fun to try your hand at something new (especially for spring) and making hot cross buns is one of those fun, rewarding challenges. There’s nothing more satisfying than enjoying fresh hot out of the oven, soft, spiced and zesty buns on Easter morning. My favourite is slathering them in butter and jam, specifically apricot jam!

Ingredients
- Active dry yeast
- All-purpose flour
- Granulated sugar
- Ground cinnamon, ground nutmeg & ground cloves
- Milk
- Unsalted butter
- Fresh orange zest
- Fresh lemon zest
- Eggs
- Dried currants
- Salt
Variation
You can make the recipe into 9, 12, or 18 buns. It really just depends on the size you’d like. I prefer making smaller buns. Use a kitchen scale to get the same size buns for even baking. And be careful of your baking time as it will differ.
What are Hot Cross Buns?
Hot Cross Buns are a spiced sweet bun made with currants or raisins that is marked with a cross on the top, traditionally eaten on Good Friday. If you’d like to read about the history of Hot Cross Buns, click here to check it out on wikipedia.

Tips on Making Hot Cross Buns
- Be Kind to Yourself: First and foremost, don’t be too hard on yourself! If you get it right on your first go, congratulations but most likely you’ll have to make the recipe a few times before you perfect it.
- Check Your Yeast: Make sure your yeast hasn’t expired and is still active – if it doesn’t bubble and foam after the required time, it’s not active and you’ll have to go to the store and buy some fresh yeast.
- Use Glass for Proofing: Use a glass bowl when proofing your dough. Metal holds hot and cold temperatures making rising difficult and stressful on the dough.
- Create a Warm Environment: A warm kitchen is all you need for the proofing stage of your dough. If the room is cold or there are drafts, set your oven to the lowest setting (probably around 100-200˚F) and place your covered bowl inside with the oven door ajar.
- Infuse Citrus Flavours: The best way to get that lovely citrus flavour is to infuse the citrus peel in a pot with your butter and milk and melt everything together.
- Incorporate Currants Efficiently: The currants can be a pain to work into the dough. Make sure to add them right away and get them worked into the dough. You will still get currants popping out as you knead, but at least you’ll get most of them in there to start.
- Space Rolls Properly: On the second rise, when you’ve rolled your dough into rolls, make sure you place them close together but not too close that they are touching! If they are too close together the buns will have a hard time baking all the way through.
- For Pretty Crosses: In order to get the pretty cross on top of the buns, make sure your paste is a little on the thicker side. A runny paste can spread and make the crosses less defined. Aim for a consistency that holds its shape when piped onto the buns.

How To Make Hot Cross Buns
Step One: Proof yeast in warm water and sugar. In a saucepan on low heat melt butter with the milk, orange peel and lemon peel. Create a well in your flour mixture, add your warm milk mixture, yeast mixture, and eggs slowly. Stir and mix together.
Step Two: Bring the flour into the centre of the well and mix until dough becomes ragged, add your currants. Turn out the dough onto a work surface and knead for approx. 10 minutes. Place the dough into the centre of a clean bowl, cover with plastic and let rest for approx. an hour or until doubled in size.
Step Three: Once doubled in size, punch down dough and transfer to a work surface. Cut dough into 9, 12, or 18 even pieces. Roll each piece into a ball, stretching and pinching dough together. Roll each ball to seal, using the palm of your hand. Then place the balls onto a baking sheet. Cover and let rise until doubled in size.
Step Four: Make your cross mixture; mix water and flour together. Using a piping bag with a small tip, pipe crosses over each roll.


Step Five: Bake in center of oven until golden brown. Meanwhile make your glaze. Add sugar and water into a small saucepan, dissolve sugar in water over medium heat. Remove from heat and brush the tops of each hot cross bun.


Hot Cross Buns
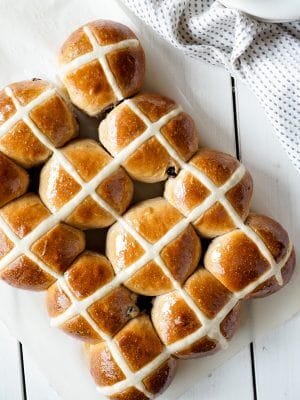
This is a traditional hot cross bun recipe, full of spices and citrus zest! This recipe makes 9, 12, or 18 buns. You choose how big or small you like your buns to be! Watch your baking time as it will vary with the size of the buns.
- Prep Time: 3 hours
- Cook Time: 15 mins
- Total Time: 3 hours 15 mins
- Yield: 12 1x
- Category: Bread
- Method: Baking
- Cuisine: British
Ingredients
- 1/2 cup granulated sugar, divided
- 1/4 cup warm water
- 1 pkg (7 grams) active dry yeast
- 3 cups all-purpose flour
- 1 Tablespoon cinnamon
- 1 teaspoon nutmeg
- 1/2 teaspoon salt
- 1/4 teaspoon ground cloves
- 3/4 cup milk, warmed
- 1/4 cup unsalted butter, melted
- The peel of 1 large orange and 1 large lemon
- 1 large egg
- 1 egg yolk
- 1/4 cup dried currants
Glaze
- 2 Tablespoons granulated sugar
- 2 Tablespoons water
Cross
- 3 Tablespoons warm water
- 3 Tablespoons all-purpose flour
Instructions
- In a small bowl add warm water, yeast and 1 tablespoon of the sugar. Let sit until the yeast starts to bubble and foam, approx. 10 minutes.
- Meanwhile, in a large glass bowl combine flour, cinnamon, nutmeg, salt, ground cloves and the rest of the sugar. Mix to combine and set aside.
- In a saucepan on low heat melt butter with the milk, add orange and lemon peel to infuse flavours. Simmer for approx. 2 minutes to infuse, don’t boil. Remove from the heat and let cool to lukewarm.
- In another small bowl whisk egg and egg yolk together.
- Create a well in your flour mixture, add warm milk mixture, the yeast mixture and add the eggs slowly while whisking together (you don’t want the eggs to cook). Stir and mix together.
- With a wooden spoon gently bring the flour into the centre and mix until the dough starts to come together and is ragged, add currants.
- Turn out the dough onto a work surface and knead for approx. 8-10 minutes until the dough is elastic and smooth. Add a little flour as needed (you can use a stand mixer with the dough hook as well). Shape the dough into a ball.
- Lightly grease a large glass bowl with oil and place the dough into the centre, turning the dough over to grease all over. Cover with plastic and let rest for about an hour or until doubled in size.
- Once dough is doubled in size, punch down the dough down and transfer to a lightly floured work surface. Cut dough into 12 even pieces (if possible use a kitchen scale to weigh the pieces for even-sized rolls). Roll each piece into a ball, stretching and pinching dough underneath to create a ball. Roll each ball to seal, using the palm of your hand. Place the buns onto a baking sheet lined with parchment paper, approx. 1 inch apart.
- Cover the buns and let rest until doubled in size, approx. 45 minutes.
- Meanwhile, preheat your oven to 375˚F.
- Make your paste for the crosses. Mix water and flour together. Using a piping bag with a small tip, pipe crosses over each bun.
- Bake in the center of oven for approx. 15-20 minutes or until golden brown.
- Meanwhile make your glaze. Add sugar and water into a small saucepan. Over medium heat, dissolve sugar in water. Once the sugar is dissolved remove the pan from the heat and using a pastry brush, brush the tops of each bun. Enjoy the same day!
Notes
Make sure to keep your dough covered at all times with plastic wrap or a damp tea towel, or it will dry out and form a crust on it.
Store buns once they are completely cooled in a plastic bag or an airtight container. Buns will last 2 days or freeze for up to one month.
You can make the recipe into 9, 12, or 18 buns. It really depends on the size you’d like. Just watch your baking time as it may differ a little.
Nutrition
- Serving Size: 1 bun
- Calories: 202
- Sugar: 9.5g
- Sodium: 138mg
- Fat: 5.3g
- Saturated Fat: 3g
- Unsaturated Fat: 0
- Trans Fat: 0
- Carbohydrates: 34.1g
- Fiber: 1.4g
- Protein: 4.7g
- Cholesterol: 43mg
FAQ’s
There can be many reasons for dense hot cross buns. Some common issues are:
1. Underproofing the dough: Proofing allows the dough to rise and develop air pockets, which contribute to a light and fluffy texture. If you don’t proof the dough long enough, it may not have had enough time to rise, resulting in a dense texture. Timelines in recipes are guidelines as no two homes have the same temperature. You want to make sure your dough has doubled in size. This may take longer or shorter than the time recommended in the recipe.
2. Not kneading the dough enough can also cause dense buns. The process of kneading is what develops the gluten strands. If the dough hasn’t had enough time to develop during kneading it can cause the dough to be dense.
3. Adding too much flour during the kneading process can result in dense buns. Use extra flour sparingly.
Yes, you can make hot cross buns ahead of time. Simply refrigerate unbaked buns for up to one day and then bake as directed. Or you can freeze the unbaked buns for up to one month. When ready to bake thaw and bake them as directed. Alternatively, you can bake the buns and then freeze them for up to 2 months. Reheat in the oven at 350˚F for 6-8 minutes for warm buns.
Yes, you can use whole-wheat flour to make hot cross buns. However, the buns may be denser and heavier. I’d suggest doing a combination of all-purpose flour and whole-wheat flour to achieve a nicer texture.
You may also like:


Leave a Rating and Comment!
I love hearing from you! Leave a comment with any questions or how your recipe turned out (your email address will not be published)!
Hot Cross Buns! One of my favourites..it must be Easter! Love them just with raisins. Thanks for the recipe. Will try it soon.
A favourite of mine too 🙂 Hope you enjoy the recipe Cathy, Happy Easter!
I have a question..is the peel to be chopped up? Or grated or ?
Thanks…
Hi Carol, depends on what tool you use for grating/zesting your peels. It’s really how you desire it, I use a zester that creates long strings and then chopped it down a little. If you’re using a fine zester that’s okay too.
Again for me this recipe produced a perfect result. The tips were helpful. I especially liked the use of zest and not candied peel to give a subtle citrus flavour.
I would make this recipe again and have sent it to friends, already!
Carol, thank you for sharing. I’m so happy that you like the recipe and will be making them again. Happy Spring 🙂
So fun and easy to make! Read through recipe before beginning, there is a lot of important steps.
Will definitely be making again a few times before Easter to practice more.
Yesss Courtney… I loved all the pictures and video you shared on instagram. Your buns 😉 looked perfect! Well done. And definitely, the more you do it the better you’ll get! Hope you had a nice Easter!
Is the orange and lemon peel grated?
Hi Frances, yes the orange and lemon peel can be either grated or zested.